Saturday, July 7, 2018

Paper Succulent Tutorial

Warning: The post you are about to read contains an exhaustive, in-depth tutorial on how to make a large paper succulent.  Only read if you want to be inspired by how simple it is to create something so beautiful.

Still here?  Good.  Let's do this! 

The template I used for this tutorial can be found on the JoAnn Fabrics website. Click Here!

The materials I used are:
-Cardstock (whichever thickness, color, texture... you prefer)
-Hot Glue (sticks and gun)
-Small Dowel (paintbrush handle, glue stick, pencil... anything to help roll the paper)
-Template
Optional:
-Cricut
-Cutting Mat
-Weeding Tools

Another option is a cute little companion to sit by your feet while you work.
Oliver loves being right under where I'm working, both in the office and the kitchen.

You do not need to have a Cricut (or similar) to complete this project, it just saves a lot of time.  You can print the template onto your cardstock and cut by hand if you so wish.

I downloaded the template PDF, snapped screenshots and loaded them into my Cricut Design Studio to make them cut files.  I wanted to make a smaller succulent than the green one I made the day before, so I did not cut the largest shapes.  Regardless of how you decide to use the template, be sure that you make two copies of the largest shapes, because they are only halves. 

Here is my step-by-step walkthrough.

This is the template being cut using Cricut Design Studio.

Cricut hard at work.  It really saves so much time.

After the shape is cut out, weed away all of the scrap paper.
Then, carefully peel the shape off of the cutting mat.

Everything is cut out and ready to go.
I also cut out a cardstock circle to use as a base. 
On the largest of the shapes, I cut each petal off to be placed independently.
Then, I cut a slit in the bottom, so I can overlap it, causing the paper
to stand up from the base.
This is the bottom overlapped to increase dimension of finished product.

Because I didn't use the largest shape, my 2nd largest piece is this full section.

I cut all of these style of shapes in half.  That way I can overlap the bottoms
and add dimension.  You could also cut them into thirds or fourths.
Cutting the slit in the bottom to allow me to overlap. 
You want to do this to all of the pieces.  It gives the succulent a more
realistic and attractive shape.

All of my sections are cut in half, with their slits, ready to roll.

Because I'm a highly skilled professional, I use only the fanciest of tools.
This is a highly sought after glue stick.  Haha!
Seriously, you can use anything with a rounded design, the size will vary
based on which size petal you are rolling.
Here, I'm rolling the tip inward.

For the largest pieces, I also roll the edges back.  You can do this however
you think it looks best.  There is no wrong way to do this.

My six largest pieces are all curled, so now I will push them aside to work
on ALL of the tiny pieces.

For these itty bitty succulent pieces, I needed something much smaller than
a glue stick.  Yesterday, I used the handle of a small paintbrush.
Today, I decided to use this Cricut weeding tool (blade protector in place).
Again, anything of a suitable size will work. Don't overthink it.

This part takes the most time.  I curl all of my smallest sections inward,
but I vary how I fold the larger pieces.  Some go inward, others I roll in
and then roll one side back.  Do what you think looks best.

After getting my pieces all rolled and prepped, I needed to stop for a lunch break.
You do not need to use all of the sections.  I skipped a few of the smaller sections,
but I still rolled them all, because you just never know what you will want to use.

I flipped them all over so I could keep them contained, and still work
from largest to smallest.

I make a circle out of cardstock to use as my main base.  I lay out the largest
sections and eyeball where I think they will need to be for the
best symmetry.

This is when I hot glue the inside tip, which projects the paper off of the base.

This is after hot gluing all of the largest petals to the base.
If you prefer, you can put them closer together and overlap the pieces.

When adding the smaller sections, be sure to stagger them.
You want to try and keep all the gaps filled.

This is after laying down the 3rd layer.  Just keep working in and staggering.

The 4th section is where I originally had it rolling inward.
I quickly realized that I didn't like how that looked, and after attaching
the 5th section, I went in and re-rolled parts of them backward.

Different paper will lay differently.  This was a thinner, less textured
paper than I had previously used, but the color perfectly
complimented the original, so I went with it.

I went in and rolled back one half of all the petals in the 4th and 5th sections.
Then, I finished filling in with a few of the smaller sections.
Because it was a thinner paper, it was much less stiff than my other
paper succulent, so I glued some of the outer petals to some of the inner petals
to add even more dimension and stability.

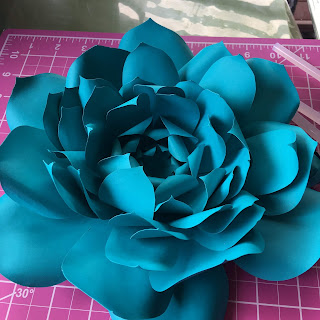
I am so pleased with the finished product.

This might be my new favorite color.

It's interesting to see the comparison between these two paper succulents.
The green is a thicker, slightly textured paper, and I used the largest petals.
The blue is a slightly thinner paper that is one section smaller.

I can't wait to see these on my bulletin board!

And there you have it, every step of the process.  Really, you can do this project however you want.  As long as you are happy with the outcome, it's a success.  I hope that this tutorial was able to help you with creating paper succulents for your own use.  Be sure to drop me a comment and let me know how it worked out for you!

Happy Crafting!
-Tara

Tuesday, July 5, 2016

My Year of New!

This past year has definitely been the year of "new" in my life. I bought my first house in September. It has been an exciting adventure! I have loved every second of putting together a new home. Choosing all of the new furniture and decorations has been a lot of fun! I had a clear vision for each room, except my home office. I avoided even going into the room, and it eventually became a dumping ground for every random thing I had. Movies, craft supplies, things I bought for school use... It all ended up on the floor in this poor room. Until, inspiration struck. A couple of weeks ago I decided how I wanted to design my home office. I blew up my Pinterest board with ideas. After a successful trip to IKEA (and the new Portillo's restaurant in Tampa) I had all of the "stuff" I needed to finally put this room together. I am still waiting for just the right storage bins, but I painted and put together all of my new shelves. This once neglected room has quickly become my go to space. I can honestly say that I have spent more time in this room in the past week than I had for the entire preceding 10 months that I have lived in this house!

 Adding to my year of new, at the end of May I finally met my new little love! I am now the proud mother of a 5 month old Shih Tzu named Oliver. He has certainly spiced things up around here. I love that I have the whole summer to bond with him and really get to know him. He is a real character!! He loves to play fetch and has mastered the whole "sit, shake, roll-over" routine. His favorite toy is a little squeaky Lambchop stuffed animal.

Look at this sweet face.  I love him so much!
Yes, he has a shark bed.  No, he isn't as thrilled about it as I am!
 I figured, since I now have an office that I love, it was time to update my blog and get started again. I am so excited about this upcoming school year! I am returning to a classroom that I spent 3 years in. I am going to be teaching 4th grade again. 2nd grade was fun, and I thought that was what I wanted to teach, but I soon realized that I love working with kids a little older. So, back I go!

Sunday, May 3, 2015

The Day the Crayons Quit Writing Papers

I JUST finished the cutest writing papers ever!  I am going to use them with Drew Daywalt's "The Day the Crayons Quit".  We have finished with the Reading curriculum for the school year, so I'm trying to come up with fun, yet enriching, activities for the last couple of weeks of school.  I figured this book was a great way to incorporate both letter writing as well as persuasive writing into 1 lesson.  I'll post some pictures of what my students come up with this week when we finish with it!


Here is the cover of my little set, just to show off my first successful hand drawn clipart images!  I love my sweet little version of crayons!  What do you think?!  I'm working hard to teach myself graphic design, and am getting a little more confident each day that goes by!

Product available HERE

Have a great week!

Saturday, May 2, 2015

Countdown to Summer

Well, that time of year has come again!  It is time to start counting down the days to SUMMER!! This year, I have decided to celebrate the end of the school year a little different than I have in the past.  We started with 26 days left, and are having an ABC Countdown.  Each day has  different activity that corresponds to letters of the alphabet.  Friday the 17th was the letter "A".  We completed an Awesome Art Project.  We read "The Lorax" and made our own beautiful landscapes with truffula trees and the "Unless" quote.

Monday April 20th was "B", which brought a Beach Day.  My students brought in beach towels and their favorite books from home.  I found a video of an idyllic beach with great sounds of waves crashing and even seagulls flying overhead.  Add in a few beach balls from the dollar store, and we had our own tropical paradise.  (I had planned for us to go outside and lay in the grass, but a sting of severe weather went through the area in the afternoon.  Two nearby schools sustained some damage from the strong winds.)

Some of my students enjoying a tropical twist to their
normal reading time.

I brought "Anne of Green Gables" in memory of
Jonathan Crombie who passed recently.
The 21st was our "C" day.  We celebrated by dressing CraZy!  Think backwards shirts and mismatched patterns.
Lots of mismatched patterns!

Backwards shirt!
This countdown has been so much fun!  Here is my full countdown calendar.  Some of the days were a little difficult to come up with special events for the letter, or I tried to incorporate already assigned days into the cute calendar. 

What is your favorite way to celebrate the end of a school year?